Something you will have to learn very early on at summer camp is how to build a campfire! Campfires are a massive tradition at camp, with songs, games and, of course, s’mores being the order of the day. (If you don’t know what a s’more is, you’re in for a massive treat – see ‘S’ on the ‘A-Z of Summer Camp’ post or check out this infographic).
But how do I make a fire, I hear you cry? I’ve never even camped before!
It’s really not as hard as you may think, as there are pretty much only 2 main ways to build a campfire and there is an easy system for both!
The first type of fire (and one you won’t really be using that often at camp) is what I like to call a ‘Teepee’ style fire. These are the ones you might typically expect to see, but we don’t often build them at camp as they can grow quite big, quite fast and are very rapid burners, which is not what you want when around children who are trying to roast their marshmallows!
The second type of fire (and the one you will most likely be making at camp) is called a ‘Log Cabin’, and it looks a little bit like the game Jenga but without the middle blocks). It’s a much slower burner and the flames don’t reach as high, so it’s heaps safer for kids to be around. Confused? Read on…
Step 1.
Find/dig a fire pit. Your camp will usually have these already set up for you in places that they use all the time. But just in case – your fire pit should be away from tents, low hanging branches, and anything else that could catch on fire. Also, place a ring of rocks/large stones around the outside of the fire pit to stop any fire catching onto the grass or surrounding area. You now need to go and get a fire bucket – this is a bucket filled with water that you will use to put your fire out when you’re done. Never start a fire without having a bucket of water to put it out with.
Step 2.
Go and find your tinder and kindling. This is basically any small sticks, twigs, dry leaves (everything needs to be dry) and, best of all (if you can find it), bark from birch trees – DO NOT take bark off the tress though, you can use anything you find on the ground.
For tinder & kindling, try to find sticks of different sizes that you can use as your fire progresses. So you need some teeny tiny sticks which will burn in 1 minute (these are called your 1-minute sticks). then get some slightly larger sticks – these are your 3-minute sticks. Then go for ones that are a little bigger – these are your 5 minute sticks.

Step 3.
Build a small teepee from your kindling. I always like to start with a little pile of dry leaves to build around. Use your 1-minute sticks first and place them around the pile of leave in a teepee shape. Then layer your 3-minute sticks around that, followed by your 5-minute sticks.
Step 4.
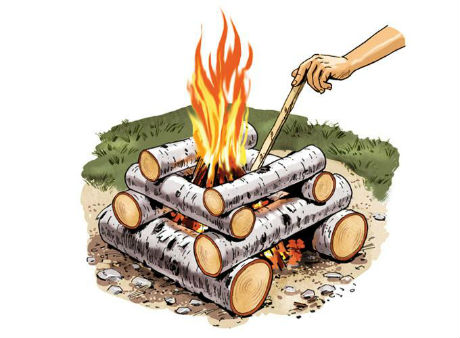
Once you have your teepee, you can now build your log cabin! Get two large logs and place them parallel to each other on either side of the teepee. Then get another 2 logs and put them on top of your first logs at a 90º angle, parallel to each other again (see first photo above).

Lighting your fire! My favourite way to do this is to light the end of a large-ish piece of birch bark (using a match or lighter) and then poke that into the centre of your little teepee, so that the dry bits inside (leaves, bark and kindling) catch the flame and your fire gets going.
Step 6.
Once your teepee has caught alight, my next tip is to get your face really close (but don’t burn your eyebrows!) and blow into the middle of the fire. This creates air circulation (and we all know that fire needs oxygen to survive) and your logs will start to catch too.
Step 7.
You did it! Your fire is alight! Well done!
Now you just need to keep an eye on it, adding more logs when it starts to burn down, and making sure none of the logs fall outside the fire circle. Your fire is at its hottest when it goes white – this is the perfect time to cook things and roast your marshmallows (much better than sticking them right into the flames and setting them on fire!)
Step 8.
This is probably the most important step of all. I mentioned before that you need to have a firebucket full of water. Do you have it? Ok. Now, when you’re done with your awesome campfire, pick up that bucket and tip all the water right on top of the fire. You may need to refill your bucket and do this a couple of times. Make sure your fire is COMPLETELY out – there should be no smoke, flames, or any glowing embers. Once you think it’s out…pour another bucket of water on it!
And that’s it. How to build a campfire! Now go practice in your garden, and by the time you get to camp, you’ll be an expert!
NOTE: There are a few hings you can use to get your fire started if it has been raining or you just can’t get it lit:
– Vaseline covered cotton balls
– Torn up egg cartons
– Orange peel.
– Cotton pads dipped in wax.
– More birch bark!

This is a great little guide. Thank you!!
LikeLike